Debian
Debian12
Debian13
Icinga2
Icinga Server installieren
Diese Anleitung zeigt, wie Sie schnell und einfach ein Icinga2 Monitoring Server einrichten können.
Nachfolgend die Installationsanleitung für einen Icinga2 Server mit den folgenden Addons:
Icingaweb2
Icinga Director
Incubator
Graphite
Zertifikatsmonitoring
NagVis
Cube
Vorbereitung der Datenbank
MariaDB Server installieren:
install mariadb-server -y
MySQL Grundkonfiguration durchführen:
Wichtig
Bei der Frage, ob für root die Unix Authentifizierung aktiviert werden soll, unbedingt y für Ja eingeben.
MySQL Konsole öffnen:
IcingaDB Datenbank erstellen:
create database icingadb ;
create user 'icingadb' @ 'localhost' identified by 'icingadb' ;
grant all privileges on icingadb . * to 'icingadb' @ 'localhost' ;
Icingaweb2 Datenbank erstellen:
create database icingaweb2 ;
create user 'icingaweb2' @ 'localhost' identified by 'icingaweb2' ;
grant all privileges on icingaweb2 . * to 'icingaweb2' @ 'localhost' ;
Privilegien neu laden und beenden:
Repository und Paket installieren
Voraussetzungen installieren:
update
-y install apt-transport-https wget gnupg2
Repo Key installieren:
-O - https://packages.icinga.com/icinga.key | gpg --dearmor -o /etc/apt/keyrings/icinga-archive-keyring.gpg
Repository installieren:
DIST = $( awk -F"[)(]+" '/VERSION=/ {print $2}' /etc/os-release) ; \
echo "deb [signed-by=/etc/apt/keyrings/icinga-archive-keyring.gpg] https://packages.icinga.com/debian icinga- ${ DIST } main" > \
/etc/apt/sources.list.d/${ DIST } -icinga.list
echo "deb-src [signed-by=/etc/apt/keyrings/icinga-archive-keyring.gpg] https://packages.icinga.com/debian icinga- ${ DIST } main" >> \
/etc/apt/sources.list.d/${ DIST } -icinga.list
update
Paket und Monitoring Plugins installieren:
-y install icinga2 monitoring-plugins monitoring-plugins-contrib
Tipp: Validierung der Konfiguration
An dieser Stelle (und auch später) kann die Konfiguration geprüft werden.
Icinga Konfiguration
Aktivierung der Icinga API:
Icinga2 neu starten:
restart icinga2
IcingaDB installieren
Information
Das ist ein neueres Feature, soll die Last von der bisherigen IDO-DB nehmen.
Redis Server installieren:
-y install icingadb-redis
enable --now icingadb-redis-server
IcingaDB Feature aktivieren:
feature enable icingadb
feature list
restart icinga2.service
IcingaDB Dienst installieren:
Information
Der IcingaDB-Daemon synchronisiert die Monitoring-Daten zwischen Redis und Datenbank.
DB Einrichtung
Voraussetzung
Bevor man weiter macht, muss zuerst die Datenbank, sowie der Nutzer eingerichet sein (siehe Vorbereitung der Datenbank ).
Das Datenbank Schema laden:
-u root icingadb </usr/share/icingadb/schema/mysql/schema.sql
Anpassung der Konfiguration (/etc/icingadb/config.yml):
database :
type : mysql
host : localhost
database : icingadb
user : icingadb
password : PASSWORT-HIER-EINFÜGEN
redis :
host : localhost
port : 6380
logging :
options :
retention :
history-days : 180
sla-days : 180
options :
Nun wird der Dienst gestartet:
enable icingadb
restart icingadb
Icingaweb installieren
DB Einrichtung
Installation des Datenbankpaketes:
Wichtig
Die vorherige Installation von php-fpm ist wichtig, da sonst bei der Installation von icingadb-web auch
php installiert wird, welches auch apache2 als Abhängigkeit mitbringt.
install php-fpm nginx -y
install icingadb-web icingacli -y
Icingaweb Einrichtung
Erstellen der Nginx-Konfigurationsdatei:
setup config webserver nginx --document-root /usr/share/icingaweb2/public > /etc/nginx/conf.d/icinga.conf
Die Datei ist noch zu folgendem Stand anzupassen:
server {
listen *:80 default_server ;
server_name _ ;
# nagvis inkl. php
location /nagvis {
alias /usr/share/nagvis/share ;
location ~ \.php$ {
include snippets/fastcgi-php.conf ;
fastcgi_param SCRIPT_FILENAME $request_filename ;
fastcgi_pass unix:/run/php/php-fpm.sock ;
}
}
### INSTALLER START
location ~ ^/icingaweb2/index\.php(.*)$ {
#fastcgi_pass 127.0.0.1:9000;
fastcgi_pass unix:/run/php/php-fpm.sock ;
fastcgi_index index.php ;
include fastcgi_params ;
fastcgi_param SCRIPT_FILENAME /usr/share/icingaweb2/public/index.php ;
fastcgi_param ICINGAWEB_CONFIGDIR /etc/icingaweb2 ;
fastcgi_param REMOTE_USER $remote_user ;
}
location ~ ^/icingaweb2(.+)? {
alias /usr/share/icingaweb2/public ;
index index.php ;
try_files $1 $uri $uri/ /icingaweb2/index.php $is_args$args ;
}
###INSTALLER END
}
Achtung
Die Standardkonfiguration /etc/nginx/sites-enabled/default muss gelöscht werden, da wir eine neue Standardkonfiguration erstellt haben!
/etc/nginx/sites-enabled/default
Nginx neu starten:
Erstellung des Setup-Token
Den Token in einen Texteditor kopieren. Dieser wird dann später während der Einrichtung in der Weboberfläche benötigt.
setup token create
Tipp
Bei der Erstellung vom Token, wird selbiger auch angezeigt. Hat man diesen verloren, kann man mit
setup token show
den Token wieder anzeigen.
Webinstallation
Voraussetzung
Bevor man weiter macht, muss zuerst die Datenbank, sowie der Nutzer eingerichet sein (siehe Vorbereitung der Datenbank ).
Vorab das Log-Verzeichnis anlegen
www-data /var/log/icingaweb2/
install php-imagick -y
Aufruf von http://CHANGEME/icingaweb2/setup/
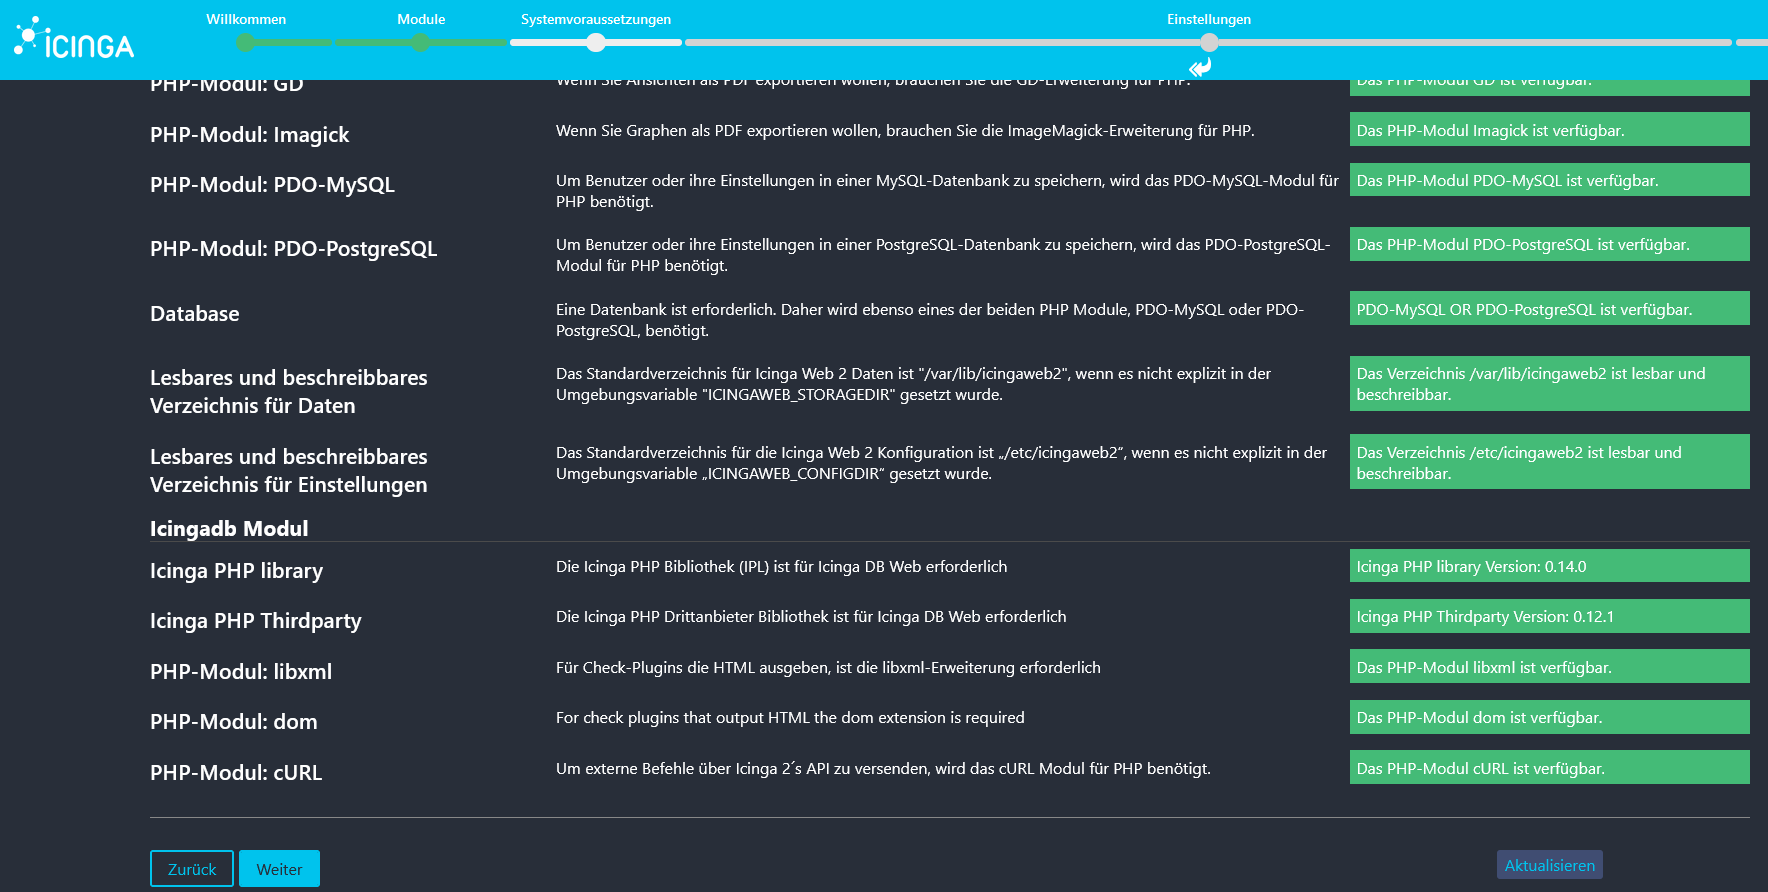
Modules Nur icingadb kein Monitoring Requirements Alles ok
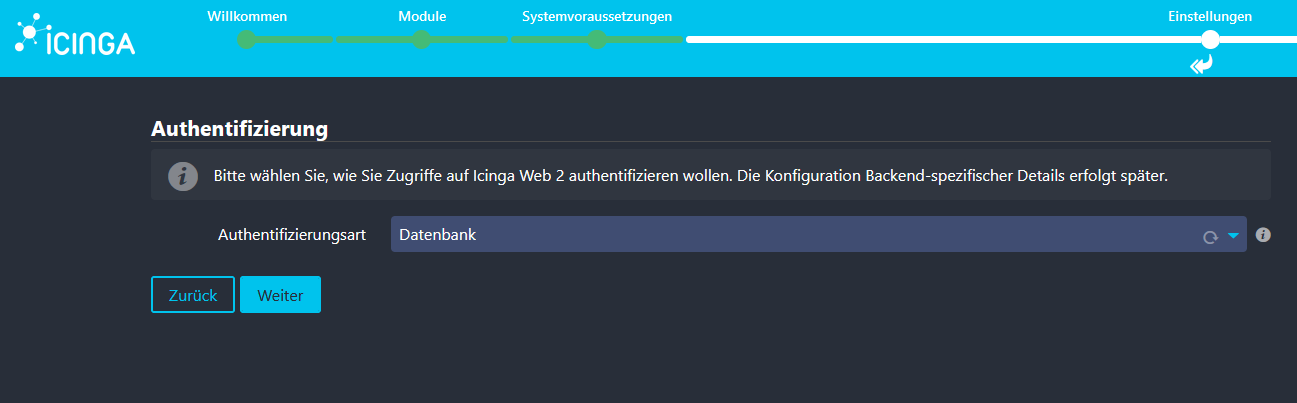
Authentication
Type: Database
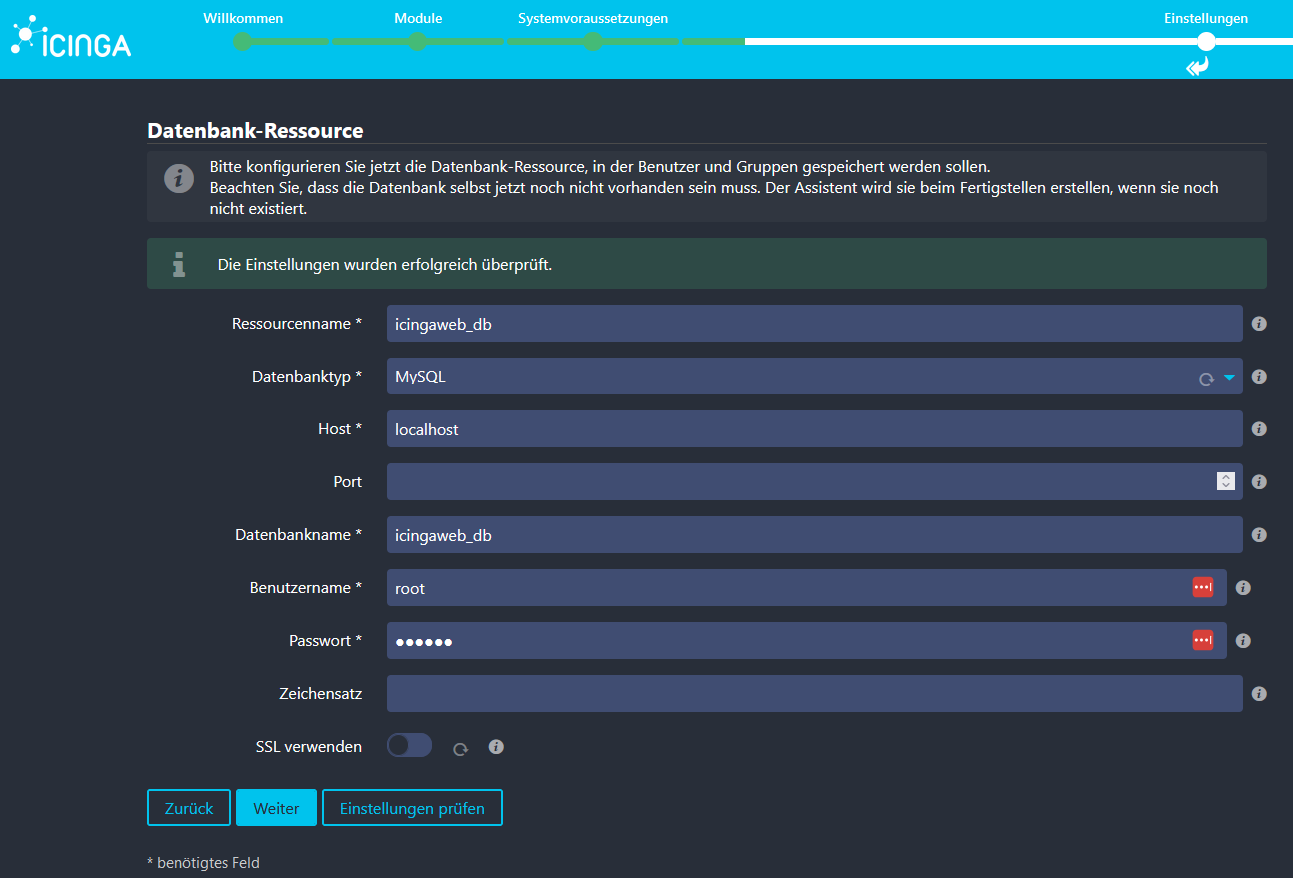
Database-Ressource
DB-Name: icingaweb2
Authentication-Backend
Backend Name: icingaweb2 (Automatisch)
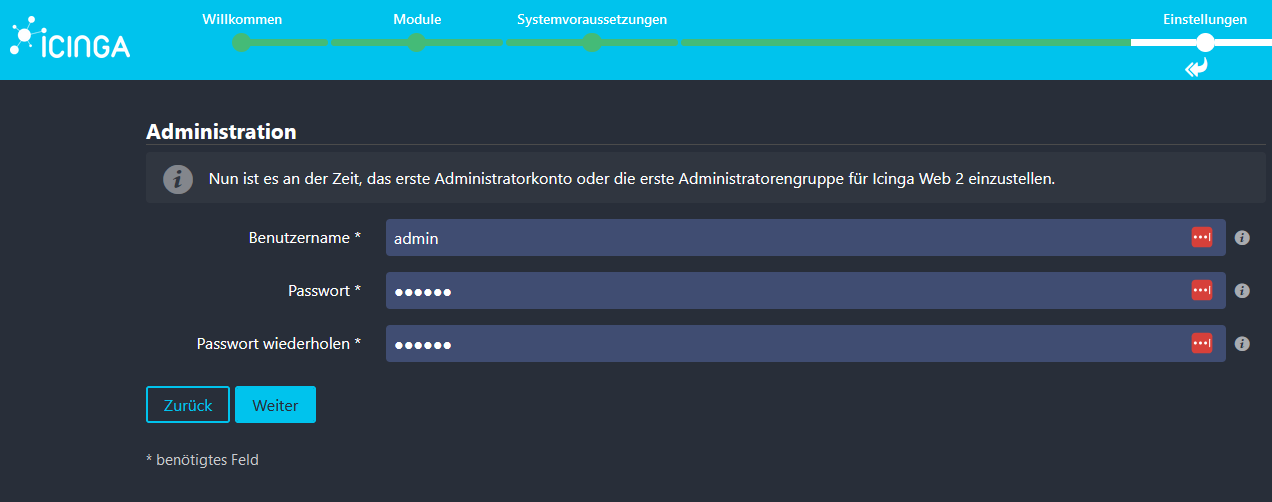
Administration
Erstellung des Admin-Nutzers
Application Configuration
Logging-Type: File (/var/log/icingaweb2/icingaweb2.log)
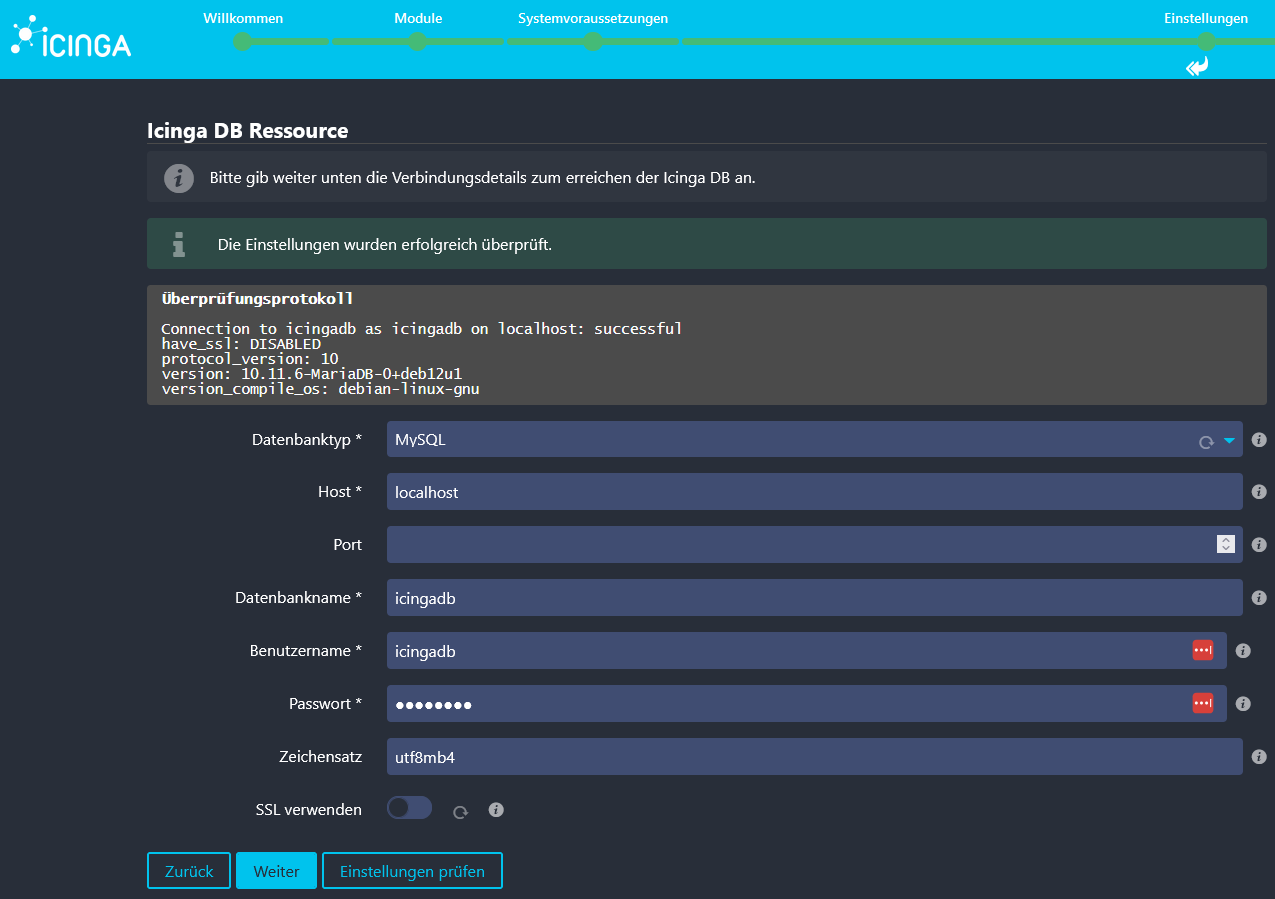
Icinga DB Ressource
Database Name: icingadb
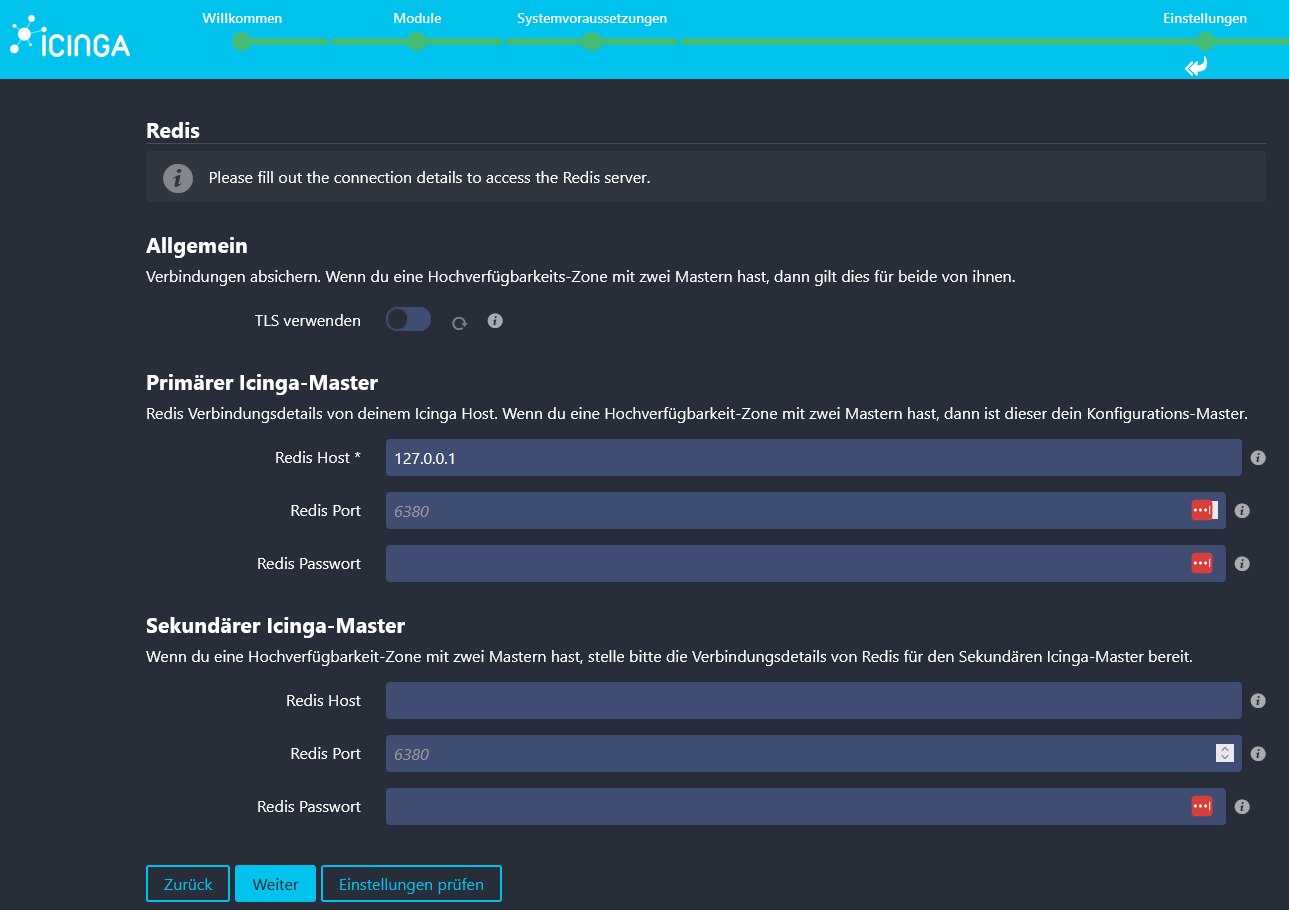
Icinga DB Redis
Redis Host: localhost
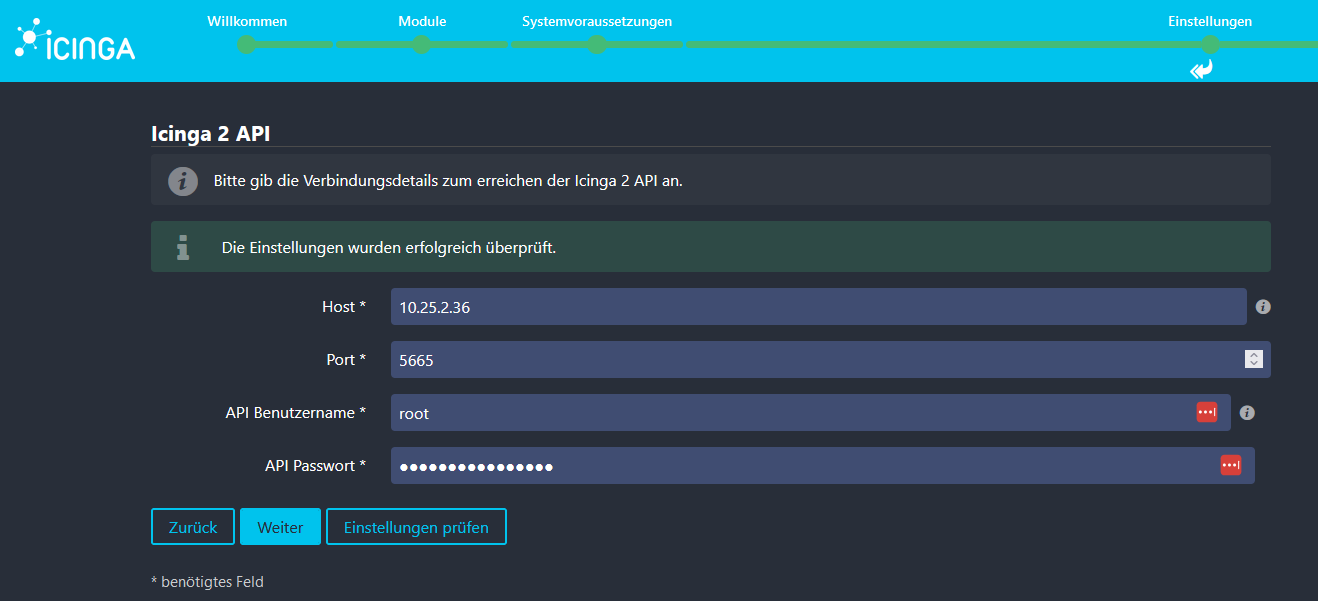
Icinga 2 API
Host: localhost
API Username: root (siehe /etc/icinga2/conf.d/api-users.conf)
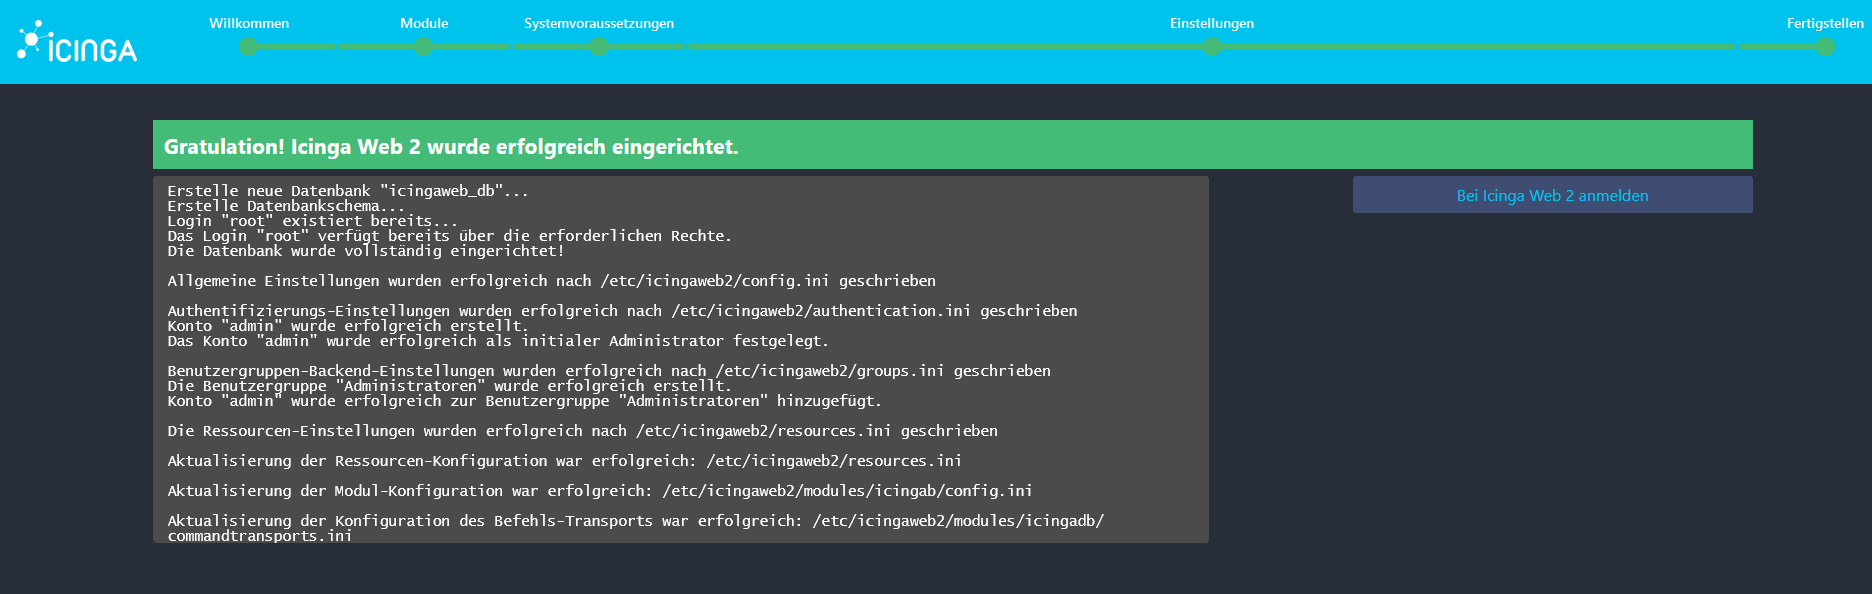
Jetzt sollte es so aussehen:
Plugins installieren & konfigurieren
Voraussetzung
Git Client installieren:
Incubator
Modul laden:
MODULE_NAME = incubator
MODULE_VERSION = v0.22.0
REPO = "https://github.com/Icinga/icingaweb2-module- ${ MODULE_NAME } "
MODULES_PATH = "/usr/share/icingaweb2/modules"
clone ${ REPO } " ${ MODULES_PATH } / ${ MODULE_NAME } " --branch " ${ MODULE_VERSION } "
module enable " ${ MODULE_NAME } "
Icinga Director
Datenbank anlegen:
-e "CREATE DATABASE director CHARACTER SET 'utf8';
CREATE USER director@localhost IDENTIFIED BY 'director';
GRANT ALL ON director.* TO director@localhost;"
Icingaweb2 Modul installieren:
MODULE_VERSION = "1.11.5"
ICINGAWEB_MODULEPATH = "/usr/share/icingaweb2/modules"
REPO_URL = "https://github.com/icinga/icingaweb2-module-director"
TARGET_DIR = " ${ ICINGAWEB_MODULEPATH } /director"
clone " ${ REPO_URL } " " ${ TARGET_DIR } " --branch v${ MODULE_VERSION }
module enable director
MySQL Schema importieren:
-p -u root director < /usr/share/icingaweb2/modules/director/schema/mysql.sql
User anlegen:
-r -g icingaweb2 -d /var/lib/icingadirector -s /bin/false icingadirector
-d -o icingadirector -g icingaweb2 -m 0750 /var/lib/icingadirector
Service installieren und aktivieren:
MODULE_PATH = /usr/share/icingaweb2/modules/director
" ${ MODULE_PATH } /contrib/systemd/icinga-director.service" /etc/systemd/system/
daemon-reload
enable --now icinga-director.service
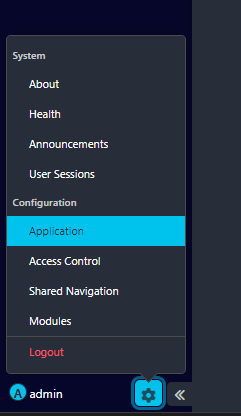
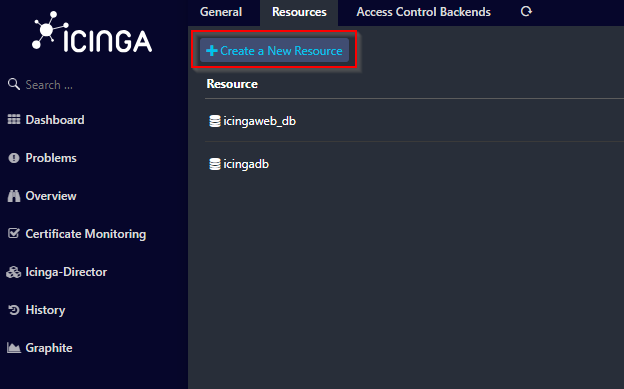
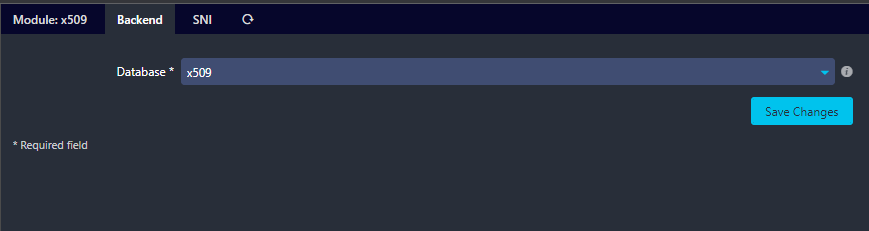
Im Webinterface eine neue Datenbank hinzufügen:
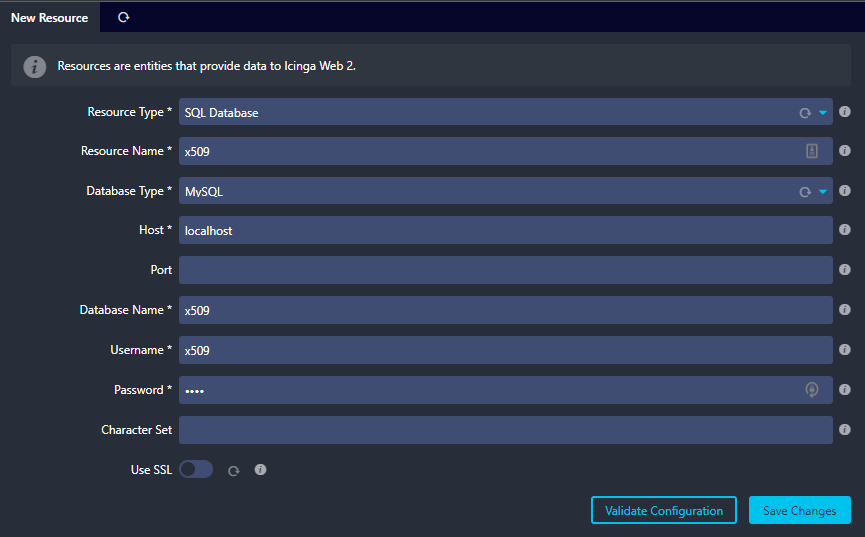
Eine neue Ressource anlegen:
Die Datenbank angeben:
Achtung!
Die Inhalte, die im Screenshot zu sehen sind, müssen angepasst werden.
Statt x509 muss director eingetragen werden!
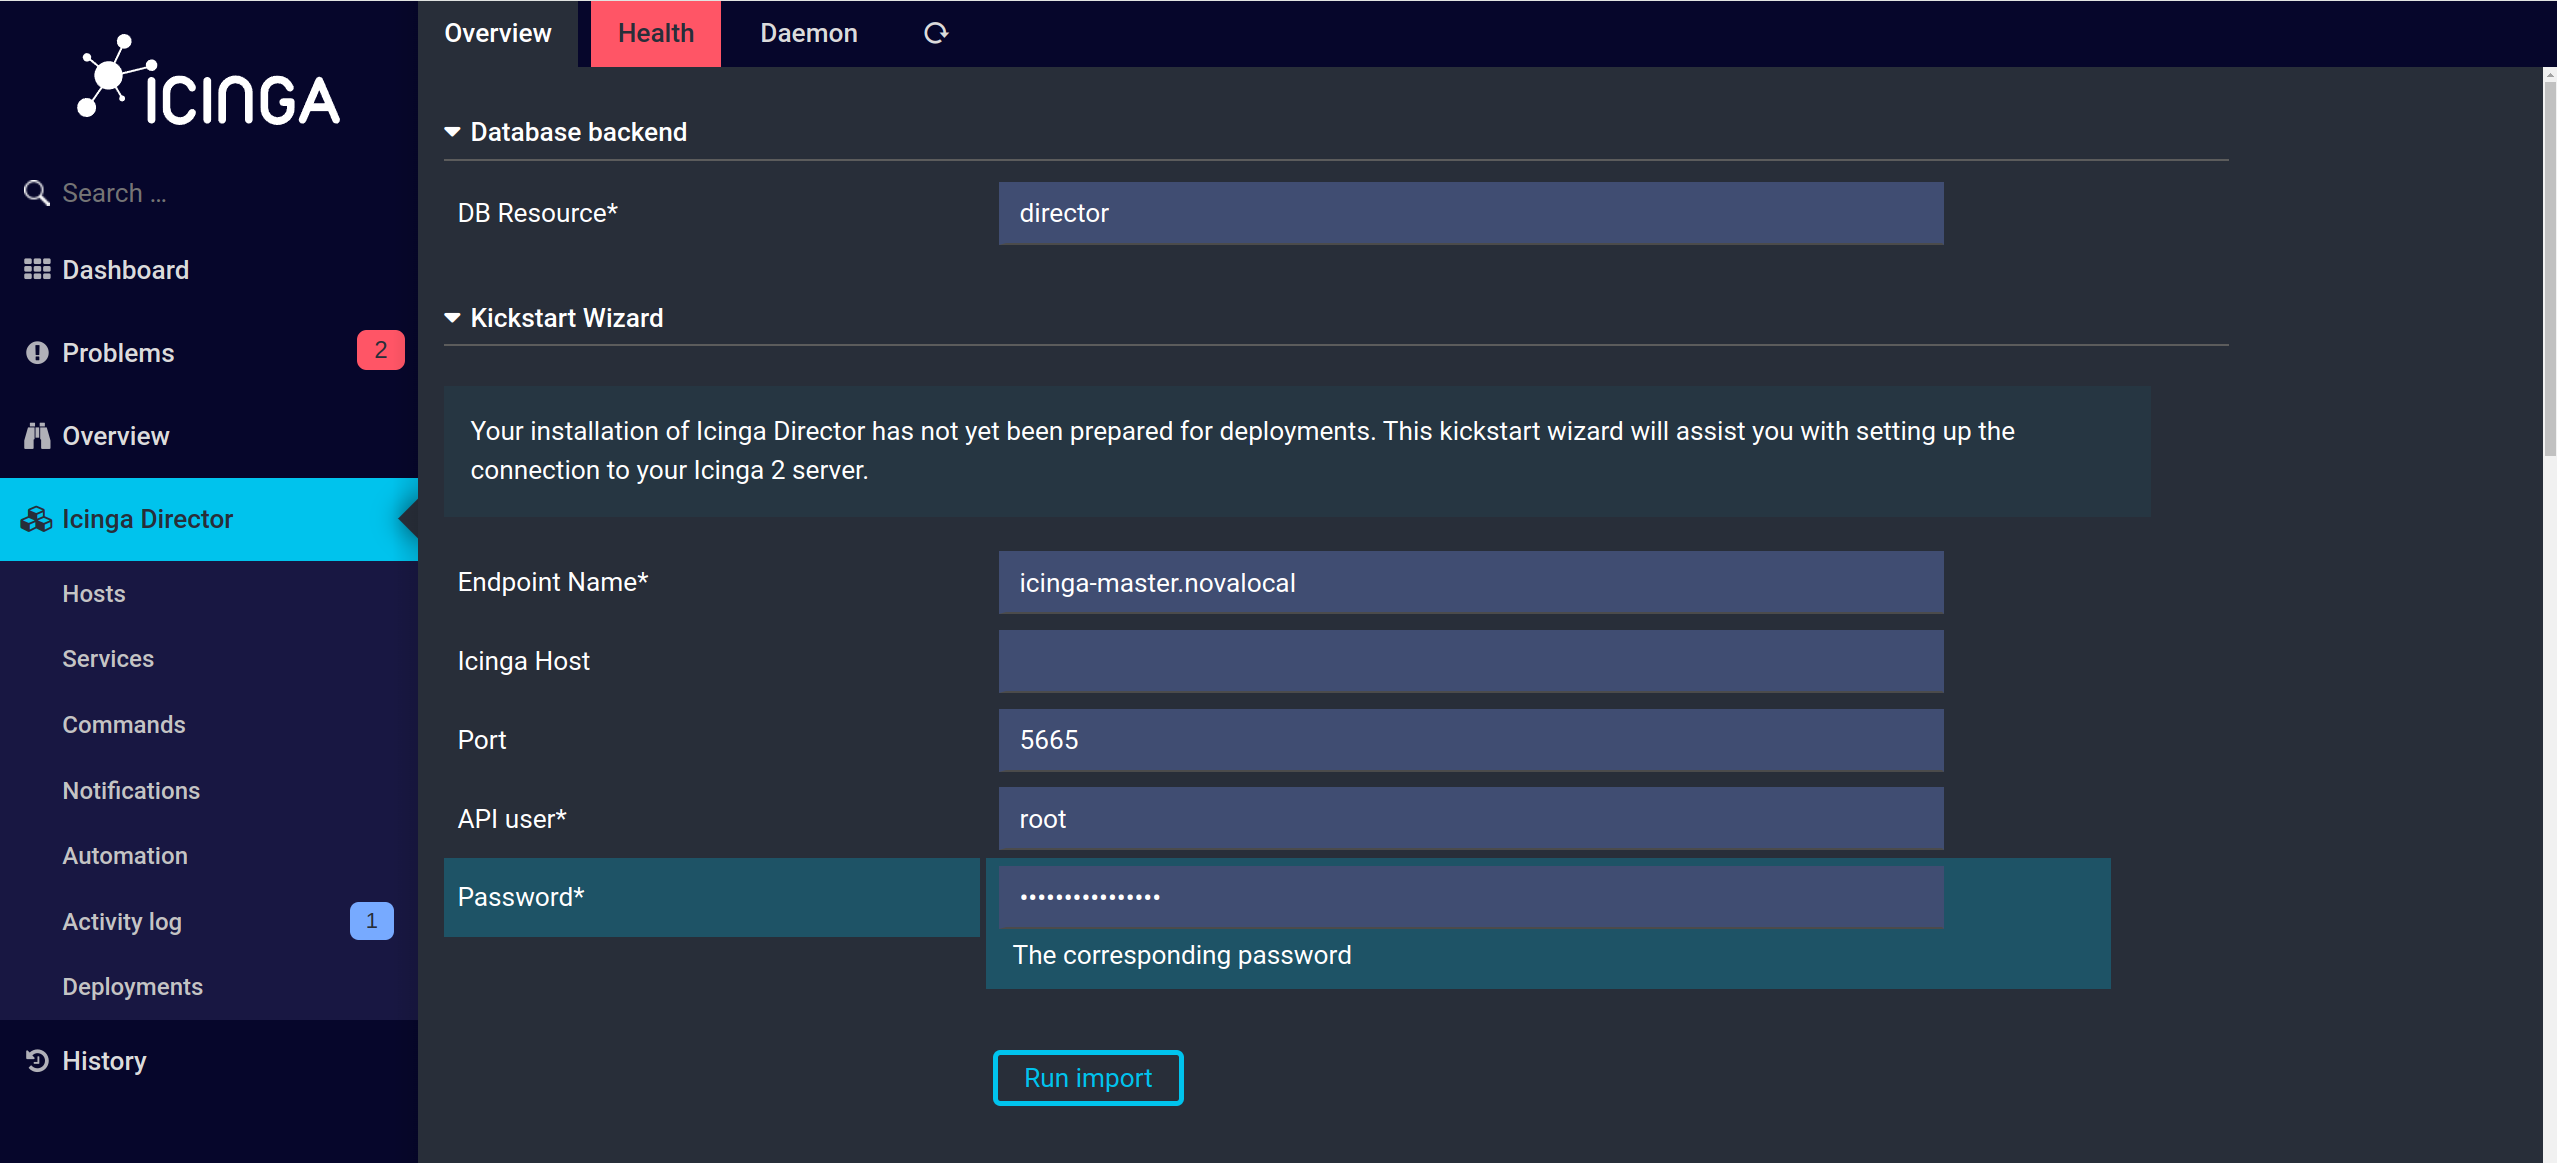
Jetzt kann der Director eingerichtet werden:
Achtung
Der Kickstart sollte wie folgt ausgefüllt werden:
Endpoint Name: FQDN ihres Servers FQDN Ihres Servers root /etc/icinga2/conf.d/api-users.conf
Graphite
Docker installieren:
-sSL https://get.docker.com/ | CHANNEL = stable sh
enable --now docker
Hinweis
Docker ist zwingend nötig!
Container starten:
run -d --name graphite --restart= always -p 8090 :80 -p 2003 -2004:2003-2004 -p 2023 -2024:2023-2024 -p 8125 :8125/udp -p 8126 :8126 graphiteapp/graphite-statsd
Graphite installiert
Grpahite läuft damit bereits und kann im Icingaweb eingebunden werden.
Das Image wird automatisch heruntergeladen.
Installation Icingaweb2 Modul:
cd /usr/share/icingaweb2/modules
clone https://github.com/Icinga/icingaweb2-module-graphite.git graphite
Installation der icinga-php-library:
install -y icinga-php-library
Aktivierung Graphite Modul im Icinga:
feature enable graphite
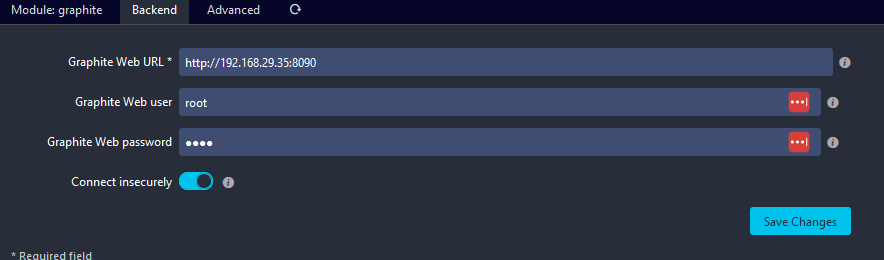
Backend vom Modul konfigurieren:
/etc/icinga2/features-enabled/graphite.conf
object GraphiteWriter "graphite" {
  host = "IP-DES-SERVERS"
  port = 2003
  enable_send_thresholds = true
}
In der GUI:
Anmeldedaten
Die Standarddaten lauten:
User: root root
X509
MySQL Konsole öffnen:
Dann in der MySQL Konsole:
create database x509 ;
GRANT CREATE , SELECT , INSERT , UPDATE , DELETE , DROP , ALTER , CREATE VIEW , INDEX , EXECUTE ON x509 . * TO x509 @ localhost IDENTIFIED BY 'x509' ;
flush privileges ;
exit ;
Installation Icingaweb2 Modul:
cd /usr/share/icingaweb2/modules
clone https://github.com/Icinga/icingaweb2-module-x509.git x509
Datenbankschema importieren:
-p -u root x509 < /usr/share/icingaweb2/modules/x509/schema/mysql.schema.sql
Im Webinterface eine neue Datenbank hinzufügen:
Eine neue Ressource anlegen:
Die Datenbank angeben:
Jetzt das Modul aktivieren und das passende Backend (eben erstellt) auswählen:
NagVis
Neustes NagVis Archiv von der Nagvis Downloadseite ⧉ runterladen und in /usr/share/nagvis entpacken:
cd /usr/share/
HIER_DOWNLOADLINK_EINFÜGEN
-xvf nagvis-x.x.xx.tar.gz
NagVis Ordner umbenennen:
nagvis-x.x.xx/ nagvis/
Ordner Rechte anpassen:
-R www-data:www-data nagvis/
Icinga Livestatus aktivieren:
feature enable livestatus
restart icinga2
Abhängigkeiten installieren:
NagVis Konfiguration erstellen:
/usr/share/nagvis/install.sh
Fragen wie folgt beantworten:
+------------------------------------------------------------------------------+
| Do you want to proceed ? [ y ]: y
+------------------------------------------------------------------------------+
| Starting installation of NagVis 1.9.47 |
+------------------------------------------------------------------------------+
| OS : Debian GNU / Linux 12 |
| |
+--- Checking for tools -------------------------------------------------------+
| Using packet manager / usr / bin / dpkg found |
| |
+--- Checking paths -----------------------------------------------------------+
| Please enter the path to the nagios base directory [ / usr / local / nagios ]: / usr / lib / nagios
| nagios path / usr / lib / nagios found |
| Please enter the path to NagVis base [ / usr / local / nagvis ]: / usr / share / nagvis
| |
+--- Checking prerequisites ---------------------------------------------------+
| PHP 8.2 found |
| PHP Module : gd compiled_in found |
| PHP Module : mbstring compiled_in found |
| PHP Module : gettext compiled_in found |
| PHP Module : session compiled_in found |
| PHP Module : xml compiled_in found |
| PHP Module : pdo compiled_in found |
| Apache mod_php MISSING |
| Graphviz 2.42 found |
| Graphviz Module dot 2.43.0 found |
| Graphviz Module neato 2.43.0 found |
| Graphviz Module twopi 2.43.0 found |
| Graphviz Module circo 2.43.0 found |
| Graphviz Module fdp 2.43.0 found |
dpkg - query : Kein Paket gefunden , das auf sqlite3 passt
| WARNING : The SQLite package was not found . |
| This may not be a problem if you installed it from source |
| |
+--- Trying to detect Apache settings -----------------------------------------+
| Please enter the web path to NagVis [ / nagvis ]:
| Please enter the name of the web - server user []: www - data
| Please enter the name of the web - server group []: www - data
| create Apache config file [ y ]: n
| |
+--- Checking for existing NagVis ---------------------------------------------+
| NagVis 1.9.47 found |
| Do you want the installer to update your config files when possible ? [ y ]: y
| Remove backup directory after successful installation ? [ n ]: n
| |
+------------------------------------------------------------------------------+
| Summary |
+------------------------------------------------------------------------------+
| NagVis home will be : / usr / share / nagvis |
| Owner of NagVis files will be : www - data |
| Group of NagVis files will be : www - data |
| Path to Apache config dir is : / etc / apache2 / conf - available |
| Apache config will be created : NO |
| |
| Installation mode : update |
| Old version : 1.9.47 |
| New version : 1.9.47 |
| Backup directory : / usr / share / nagvis . old - 2025 - 08 - 07_10 : 31 : 18 |
| |
| Note : The current NagVis directory will be moved to the backup directory . |
| The backup directory will be NOT removed after successful installation |
| Your configuration files will be copied . |
| The configuration files will be updated if possible . |
| |
| Do you really want to continue ? [ y ]: y
NagVis Konfiguration anpassen:
/usr/share/nagvis/etc/nagvis.ini.php
# Folgendes unter [global] einfügen
[paths]
base = "/usr/share/nagvis/"
htmlbase = "/nagvis"
htmlcgi = "/icingaweb2"
[defaults]
backend = "icinga"
NagVis Backend in derselben Konfiguration weiter unten definieren, dabei das default Backend für mklivestatus einfach benutzen:
[backend_icinga]
backendtype = "mklivestatus"
socket = "unix:/run/icinga2/cmd/livestatus"
NagVis Icinga Modul installieren und aktivieren:
cd /usr/share/icingaweb2/modules
clone https://github.com/Icinga/icingaweb2-module-nagvis.git nagvis
module enable nagvis
PHP SQLite Modul installieren:
install -y php-sqlite3
Anmeldedaten
Die Standardanmeldedaten lauten:
User: admin admin
Cube
Modul installieren:
MODULE_NAME = "cube"
MODULE_VERSION = "main"
REPO = "https://github.com/Icinga/icingaweb2-module- ${ MODULE_NAME } "
MODULES_PATH = "/usr/share/icingaweb2/modules"
clone ${ REPO } " ${ MODULES_PATH } / ${ MODULE_NAME } " --branch " ${ MODULE_VERSION } "
module enable " ${ MODULE_NAME } "